I was reading on Apple News today and came across a cool article I just HAD to share! I find these cool tricks & tips just addicting and love learning about new ones but I don’t often have the time to explore them all. So when I read something cool like this I instantly want to share it with all of my friends and clients that have MAC’s!
This MacOS trick in particular caught my eye because it solves a problem many of my clients have when they want to send me a screenshot and explain some problem or error they found but they don’t have the time or knowledge to use a graphics editor to markup the screenshot and point out the issues. It can lead to a lot of back and forth while we try to figure out what is going on which is frustrating for both parties.
So what is this cool trick, you ask?
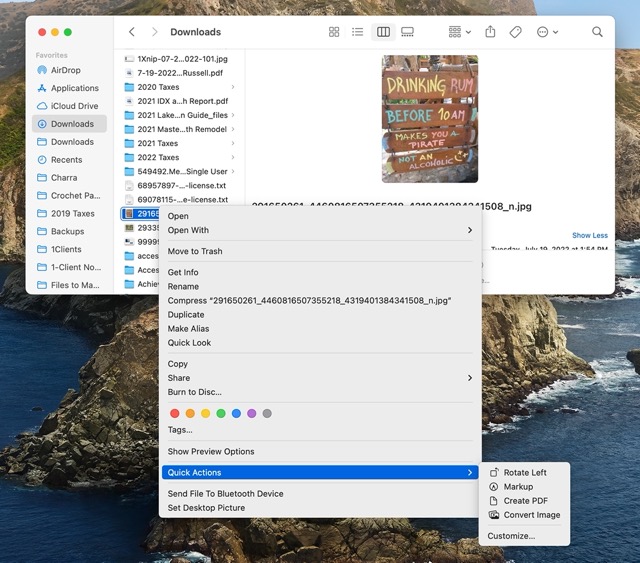
Finder Quick Actions! To see what I mean open your FINDER on your Mac and Right Click on any Document, Image or PDF and look for “Quick Actions” in the pop out menu.

For instance I just used the Quick Actions when I created the above screenshot. (arrrrgh!)
- I took the screenshot of my entire screen.
- I right-clicked on it and chose Markup
- Using the Markup tool, I cropped the image to get the closeup of only the finder and the menu.
- I hit done and saved it.
- I went back to finder and right-clicked and choose Convert Image
- I converted it to a Medium size so it made the file size smaller and more appropriate for a blog post.
That’s it! I had a blog image in about 2 minutes! Way easier than creating a screenshot and opening Photoshop. WOW! If only I had known eons ago about this tool!
Watch this Video Tutorial to see how I did it:
Online Marketing Tips
We’ve been in the online website marketing business since 2004 and we love what we do! If you are looking for more tips, check out our How to Make a Google Business Page for your Company in 7 Easy Steps or How to Add a Business to Apple Maps (For FREE!): Step-by-Step Guide!
If you need some tips on how to go viral then check out my blog post on Unleashing the Power of Viral Marketing Campaigns: 7 Tips to Make Your Blog Posts Go Viral plus Strategies, Tools, and Examples. Need help with your websites SEO? Check out My 3 BEST Real Estate Website SEO & Lead Generation Tips.
YourSiteNeedsMe is a Real Estate Websites WordPress Designer for REALTORS and enjoys writing blog posts about hot topics and fun things to do.


